# 214-Implementing Dark Mode on iOS
# System Colors
| Color | Light | Dark |
|---|---|---|
| systemBackground | ffffff | 000000 |
| secondarySystemBackground | f2f2f7 | 1c1c1e |
| tertiarySystemBackground | ffffff | 2c2c2e |
| systemGroupedBackground | f2f2f7 | 000000 |
| secondarySystemGroupedBackground | ffffff | 1c1c1e |
| tertiarySystemGroupedBackground | f2f2f7 | 2c2c2e |
| separator | 3c3c43 0.29 | 545458 0.6 |
| opaqueSeparator | c6c6c8 | 38383a |
| label | 000000 | ffffff |
| secondaryLabel | 3c3c43 0.6 | ebebf5 0.6 |
| tertiaryLabel | 3c3c43 0.3 | ebebf5 0.3 |
| quaternaryLabel | 3c3c43 0.18 | ebebf5 0.18 |
| link | 007aff | 0984ff |
| placeholderText | 3c3c43 0.3 | ebebf5 0.3 |
| systemFill | 787880 0.2 | 787880 0.36 |
| secondarySystemFill | 787880 0.16 | 787880 0.32 |
| tertiarySystemFill | 767680 0.12 | 767680 0.24 |
| quaternarySystemFill | 747480 0.08 | 767680 0.18 |
Other System Colors (opens new window)
# Materials
# UIBlurEffect
新增Style
// dynamic
case systemUltraThinMaterial = 6
case systemThinMaterial = 7
case systemMaterial = 8
case systemThickMaterial = 9
case systemChromeMaterial = 10
// light
case systemUltraThinMaterialLight = 11
case systemThinMaterialLight = 12
case systemMaterialLight = 13
case systemThickMaterialLight = 14
case systemChromeMaterialLight = 15
// dark
case systemUltraThinMaterialDark = 16
case systemThinMaterialDark = 17
case systemMaterialDark = 18
case systemThickMaterialDark = 19
case systemChromeMaterialDark = 20
2
3
4
5
6
7
8
9
10
11
12
13
14
15
16
17
18
# UIVibrancyEffect
// 新增 UIVibrancyEffectStyle
// style会忽略 contentview 上的字体颜色
init(blurEffect: UIBlurEffect, style: UIVibrancyEffectStyle)

// Vibrancy for text labels.
case label = 0
case secondaryLabel = 1
case tertiaryLabel = 2
case quaternaryLabel = 3

// Vibrancy for thicker filled areas.
case fill = 4
case secondaryFill = 5
case tertiaryFill = 6

// Vibrancy for separator lines.
case separator = 7
2
3
4
5
6
7
8
9
10
11
12
13
14
15
16
17
# Demo
let blur = UIBlurEffect(style: .systemMaterial)
let blurView = UIVisualEffectView(effect: blur)
let vibrancy = UIVibrancyEffect(blurEffect: blur, style: .label)
let vibrancyView = UIVisualEffectView(effect: vibrancy)
let contentView = UIView()
blurView.contentView.addSubview(vibrancyView)
vibrancyView.contentView.addSubview(contentView)
2
3
4
5
6
7
# Flexible
# UIColor 新增
// 返回 dynamic color 对应 traitCollection 的 color
func resolvedColor(with traitCollection: UITraitCollection) -> UIColor

// dynamic color 初始化方法
init(dynamicProvider: @escaping (UITraitCollection) -> UIColor)
2
3
4
5
# UITraitCollection
// dark or light
var userInterfaceStyle: UIUserInterfaceStyle { get }
// dark 模式下,base (全屏) or elevated (非全屏)
var userInterfaceLevel: UIUserInterfaceLevel { get }

// 当前模式
class var current: UITraitCollection { get set }
2
3
4
5
6
7
# Dynamic color 工作原理
class BackgroundView: UIView {
  override func draw(_ rect: CGRect) {
    // UIKit updates UITraitCollection.current before calling several well-known methods of UIView, UIViewController, and UIPresentationController
    // UIKit sets UITraitCollection.current = self.traitCollection
    // 然后 UIKit 根据 UITraitCollection.current 解析出具体的颜色值
    // 当 mode 改变了,UIKit 会再次调用这个方法
    UIColor.systemBackground.setFill()
    UIRectFill(rect) }
}
2
3
4
5
6
7
8
9
除 draw 方法外还有下面这些方法,可以解析 dynamic color。当 mode 改变了,UIKit 也会调用这些方法。可以在这些方法里获取 traitCollection ,然后改变颜色,比如 layer border color.
Layout is the best time to use trait

# Border Color
// Option 1
let resolvedColor = UIColor.label.resolvedColor(with: traitCollection)
layer.borderColor = resolvedColor.cgColor

// Option 2
traitCollection.performAsCurrent {
  layer.borderColor = UIColor.label.cgColor
}

// Option 3
let savedTraitCollection = UITraitCollection.current
UITraitCollection.current = traitCollection
layer.borderColor = UIColor.label.cgColor
UITraitCollection.current = savedTraitCollection
2
3
4
5
6
7
8
9
10
11
12
13
14
# When Dynamic Color Might Change
UITraitCollection 新增 hasDifferentColorAppearance 方法
override func traitCollectionDidChange(_ previousTraitCollection: UITraitCollection?) {
  super.traitCollectionDidChange(previousTraitCollection)
  // 只是颜色模式发生了改变
  if traitCollection.hasDifferentColorAppearance(comparedTo: previousTraitCollection) {
    // Resolve dynamic colors again
  }
}
2
3
4
5
6
7
# Image
UIImageView 使用 traitCollection 展示不同 mode 下的 image,如果你想自定义 image view,可以这么做
let image = UIImage(named: "HeaderImage")
let asset = image?.imageAsset
let resolvedImage = asset?.image(with: traitCollection)
2
3
# Trait Collection Changes in iOS 13
Traits are predicted during initialization
traitCollectionDidChange(_:) will only be called if any of those initial traits change
A trait change may not occur when you moved into the hierarchy as before.
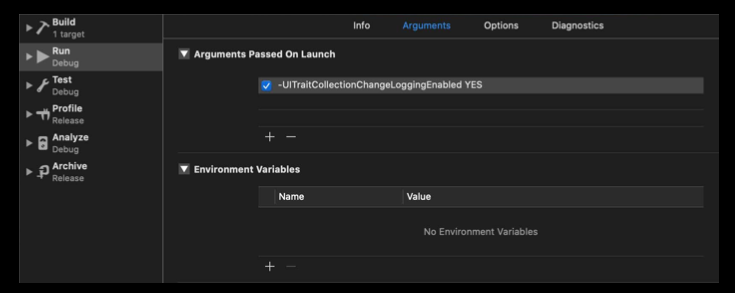
# Enable debug logging with launch argument
-UITraitCollectionChangeLoggingEnabled YES

# Overriding User Interface Style
让 UIViewController 或者 UIView 只使用某一种 mode
class UIViewController {
  var overrideUserInterfaceStyle: UIUserInterfaceStyle
}

class UIView {
  var overrideUserInterfaceStyle: UIUserInterfaceStyle
}
2
3
4
5
6
7
让整个 app 只使用某一种 mode
在 Info.plist 设置 UIUserInterfaceStyle 为 Light or Dark
# Overriding Traits
Only specify values for traits you want to override, leave all of the other traits unspecified
class UIPresentationController {
  var overrideTraitCollection: UITraitCollection?
}

class UIViewController {
  func setOverrideTraitCollection(_: UITraitCollection?, forChild: UIViewController)
}
2
3
4
5
6
7
8
# Status Bar Style
新增 darkContent 用于 light mode
原来的 lightContent 用于 dark mode
# UIActivityIndicatorView Style
废弃 gray, white, whiteLarge
新增 .medium .large, 使用 color 属性设置颜色
# Drawing Attributed Text
使用 [.foregroundColor: UIColor.label] 设置文字颜色