# 使用 Express 创建 Web 服务(二)
上一篇文章 使用 Express 创建 Web 服务(一) 详细介绍了 Express 框架,这篇文章我们使用 Express 创建 Web 服务。
首先我们先介绍一下模版引擎。
# 模版引擎
既然是创建 web 服务,就需要返回 HTML 字符串,比如下面返回一个用户列表
router.get('/', (req, res, next) => {
  const emptyHtml = `
  <div>There are no users</div>
  `
  const usersHtml = `
  <table>
  <tr>
    <th>ID</th>
    <th>Name</th>
  </tr>
  ${users.map(user => `<tr><td>${user.id}</td><td>${user.name}</td></tr>`).join("")}
  </table>
  `
  const html = users.length > 0 ? usersHtml : emptyHtml
  res.send(html)
})
2
3
4
5
6
7
8
9
10
11
12
13
14
15
16
从上面的代码我们可以看出,使用字符串插值的方式既麻烦又不好理解。而且随着业务逻辑越来越复杂,插值字符串也会越来越复杂,维护插值字符串的成本就会越来越高。
Vue 的开发者都知道,Vue 使用了 template 模板语法来简化字符串插值
<template>
  <table v-if="users.length > 0">
    <tr>
      <th>ID</th>
      <th>Name</th>
    </tr>
    <tr v-for="user in users">
      <td>{{ user.id }}</td>
      <td>{{ user.name }}</td>
    </tr>
    </table>
	<div v-else>
  	There are no users
  </div>
</template>
2
3
4
5
6
7
8
9
10
11
12
13
14
15
Vue 模板语法还带来了语法高亮、错误提示、代码格式化、模块复用等优点。
那 Express 可以使用模板语法呢? 正如上文 使用 Express 创建 Web 服务(一) 介绍的,Express 可以使用 pugjs/pug (opens new window)、mde/ejs (opens new window)、handlebars-lang/handlebars.js (opens new window)、marko-js/marko (opens new window)、mozilla/nunjucks (opens new window) 以及 janl/mustache.js (opens new window) 等模板引擎。
从 npm trends (opens new window) 中我可以看出,pug 有最多的 star,ejs 和 handlebars.js 有最多的下载量。nunjucks 类似于 Python 的模板引擎 jinja2 (opens new window)
接下来我们以 pug 为例讲解 Express 怎么使用模板引擎。
# Pug
# 安装
$ npm i pug
# 配置
Express 默认模板文件夹是 views,在 views 里创建 pug 文件,比如
if users.length > 0
  table
    tr
      th ID
      th Name
    each user in users
      tr
        td #{user.id}
        td #{user.name}
else
  div There are no users
2
3
4
5
6
7
8
9
10
11
然后设置 Express 默认模板引擎
app.set('view engine', 'pug')
使用 res.render() 渲染模板,并将 HTML 字符串发送给客户端
app.get('/', (req, res) => {
  res.render('index', { users })
})
2
3
# 语法
Pug 语法的最大特点是采用缩进表示 DOM 的层级关系,Pug 支持继承、组合、插值、条件判断、列表迭代等功能。详细介绍请参考 Pug 官方文档 (opens new window)。
# 样式
现在 HTML 有了,那样式怎么处理呢?Pug 支持 style 和 class。
Pug 的 style 支持 JS 对象,但是与 JSX、Vue 不同的是属性名使用 kebab-case (短横线连字符) 形式。
div.root-index(style={"font-size": "16px"}) Hello #{title}
<div class="root-index" style="font-size:26px;">Hello Express</div>
处理 class 有几种方法:
- 添加
linkstylesheet。首先在public文件夹里创建 css 文件,然后在模板文件里引入这个 CSS 文件。
/* /public/css/style.css */
.root-index {
  color: red;
}
2
3
4
创建模版文件
//- 模板
doctype html
html
  head
    title= title
    link(rel='stylesheet', href='/css/style.css')
  body
    block content
2
3
4
5
6
7
8
- 内联
<style>样式代码
doctype html
head
  style.
    .root-index {
      color: red;
    }
body
  div.root-index(style={"font-size": "26px"}) Hello #{title}
2
3
4
5
6
7
8
- 使用
include导入样式文件的代码
doctype html
html
  head
    style
      include style.css
2
3
4
5
那怎么使用 Sass(SCSS)、Less、Stylus 这种 CSS 扩展?
# Sass
express-generator (opens new window) 使用 node-sass-middleware 中间件,在开发阶段自动编译 Sass/SCSS 文件,但是这个中间件和 node-sass 一起 deprecated 了。NPM 里也有 dart-sass 相关的 Express 中间件,但是都很久没有更新了。因此我决定自己实现将 Sass/SCSS 文件编译成 CSS 文件。
首先安装 sass 和 chokidar。sass (opens new window) 将 Sass/SCSS 文件编译成 CSS 文件,chokidar (opens new window) 监听 Sass/SCSS 文件的变化,只要修改 Sass/SCSS 文件,就重新编译。
$ npm i sass chokidar -D
假如 CSS 代码位于 /public/css/style.css,Sass/SCSS 代码位于 /sass/style.{sass|scss}
import * as sass from 'sass'
import path from 'node:path';
import fs from 'node:fs';
import chokidar from 'chokidar';

// get the resolved path to the file
const __filename = fileURLToPath(import.meta.url);
// get the directory name of the current module
const __dirname = path.dirname(__filename);

// in v20.11.0
// const __dirname = import.meta.dirname

export const dirJoin = (...args) => {
  return path.join(__dirname, ...args)
}

// sass/scss 文件所在位置
const sassSrcPath = dirJoin('sass');
// css 文件所在位置
const cssDestPath = dirJoin('public/css');

// 编译所有 SCSS 文件
export const compileSass = () => {
  fs.readdir(sassSrcPath, (err, files) => {
    if (err) {
      console.error(err);
      return;
    }

    files.forEach((file) =>  {
      console.log(file)
      compileFile(path.join(sassSrcPath, file));
    })
  })
}

// 编译单个文件
function compileFile(filePath) {
  const fileName = path.basename(filePath);
  const cssPath = path.join(cssDestPath, fileName.replace('.scss', '.css'));

  try {
    const result = sass.compile(filePath, {
      style: 'compressed',
    });
    fs.writeFileSync(cssPath, result.css);
    console.log(`Compiled: ${filePath} -> ${cssPath}`);
  } catch (err) {
    console.error(`Error compiling ${filePath}:`, err);
  }
}

// 监听 SCSS 文件变化
chokidar.watch(sassSrcPath).on('change', (filePath) => {
  console.log(`File changed: ${filePath}`);
  compileFile(filePath);
});
2
3
4
5
6
7
8
9
10
11
12
13
14
15
16
17
18
19
20
21
22
23
24
25
26
27
28
29
30
31
32
33
34
35
36
37
38
39
40
41
42
43
44
45
46
47
48
49
50
51
52
53
54
55
56
57
58
在生产环境需要先手动编译 Sass/SCSS 文件,生成 CSS 文件,然后部署。
{
 "scripts": {
    "buid:sass": "sass sass/:public/css/ --style compressed"
  }
}
2
3
4
5
# 脚本
现在 HTML、CSS 都有了,那 JavaScript 怎么处理呢?有以下几种方法:
- HTMLElement 内联方法
body
	button#login(onclick="console.log('登录')") 登录
2
<script>内联脚本代码
body
  button#login 登录
  script.
    const btn = document.getElementById("login")
    if (btn) {
      btn.addEventListener("click", () => {
        console.log("登录")
      })
    }
2
3
4
5
6
7
8
9
- 使用
include导入 JavaScript 文件的代码
doctype html
  body
    h1 My Site
    p Welcome to my super lame site.
    script
      include script.js
2
3
4
5
6
<script>脚本文件
假设脚本文件在 public/js 文件夹
// public/js/index.js
const btn = document.getElementById("login")
if (btn) {
  btn.addEventListener("click", () => {
    console.log("登录")
  })
}
2
3
4
5
6
7
模板添加脚本文件
body
	button#login 登录
  script(src="/js/index.js")
2
3
# Web 应用 - ToDo App
现在 HTML、CSS、JavaScript 都齐活了,我们来创建 Web 应用 - ToDo。我们将实现以下功能:
- 注册
- 登录
- 任务
# 设计稿
ToDo 应用的主要功能如下:
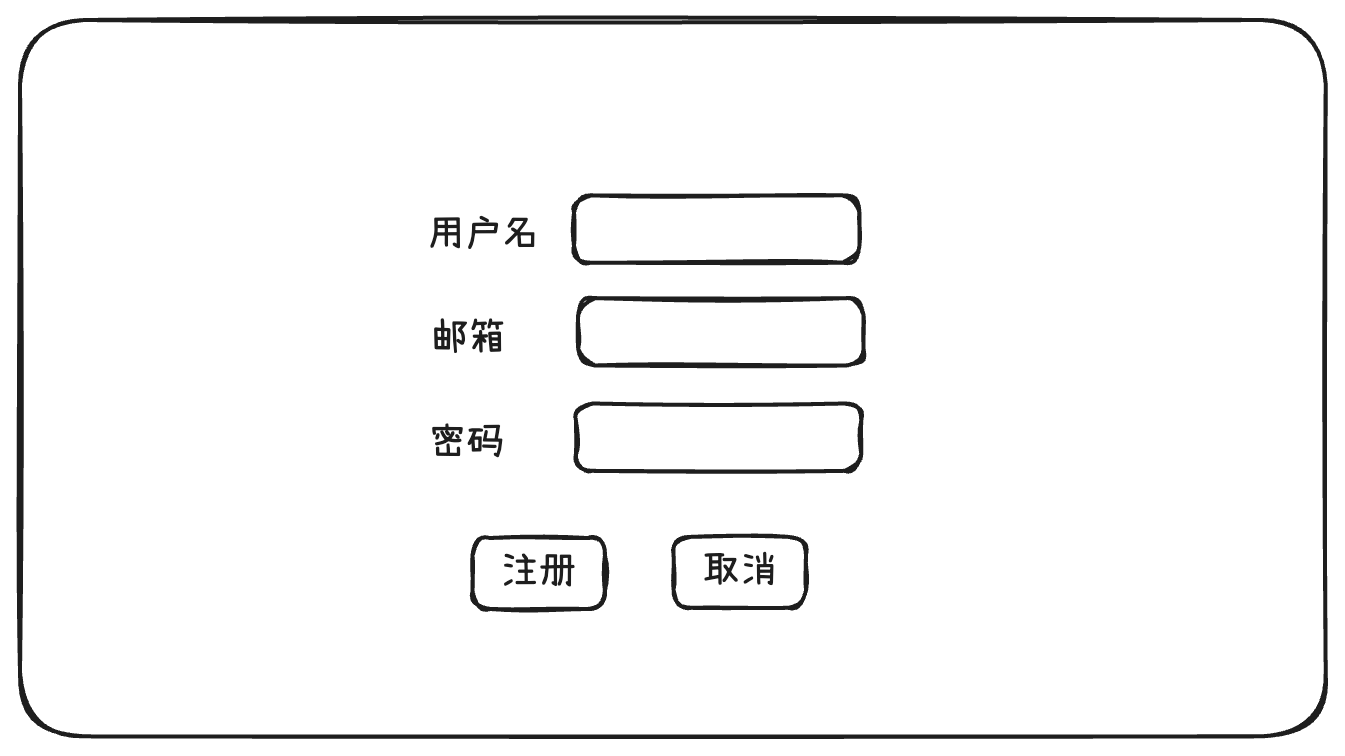
# 注册
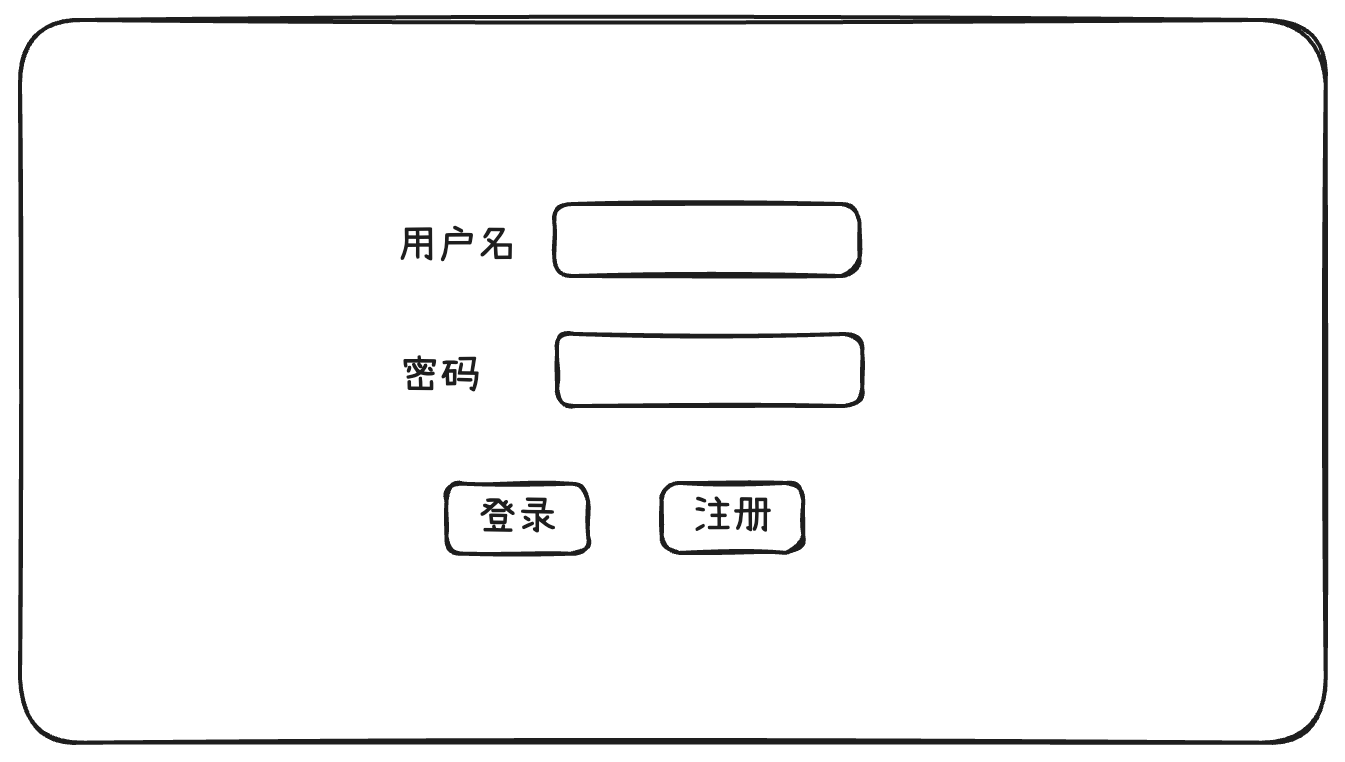
# 登录
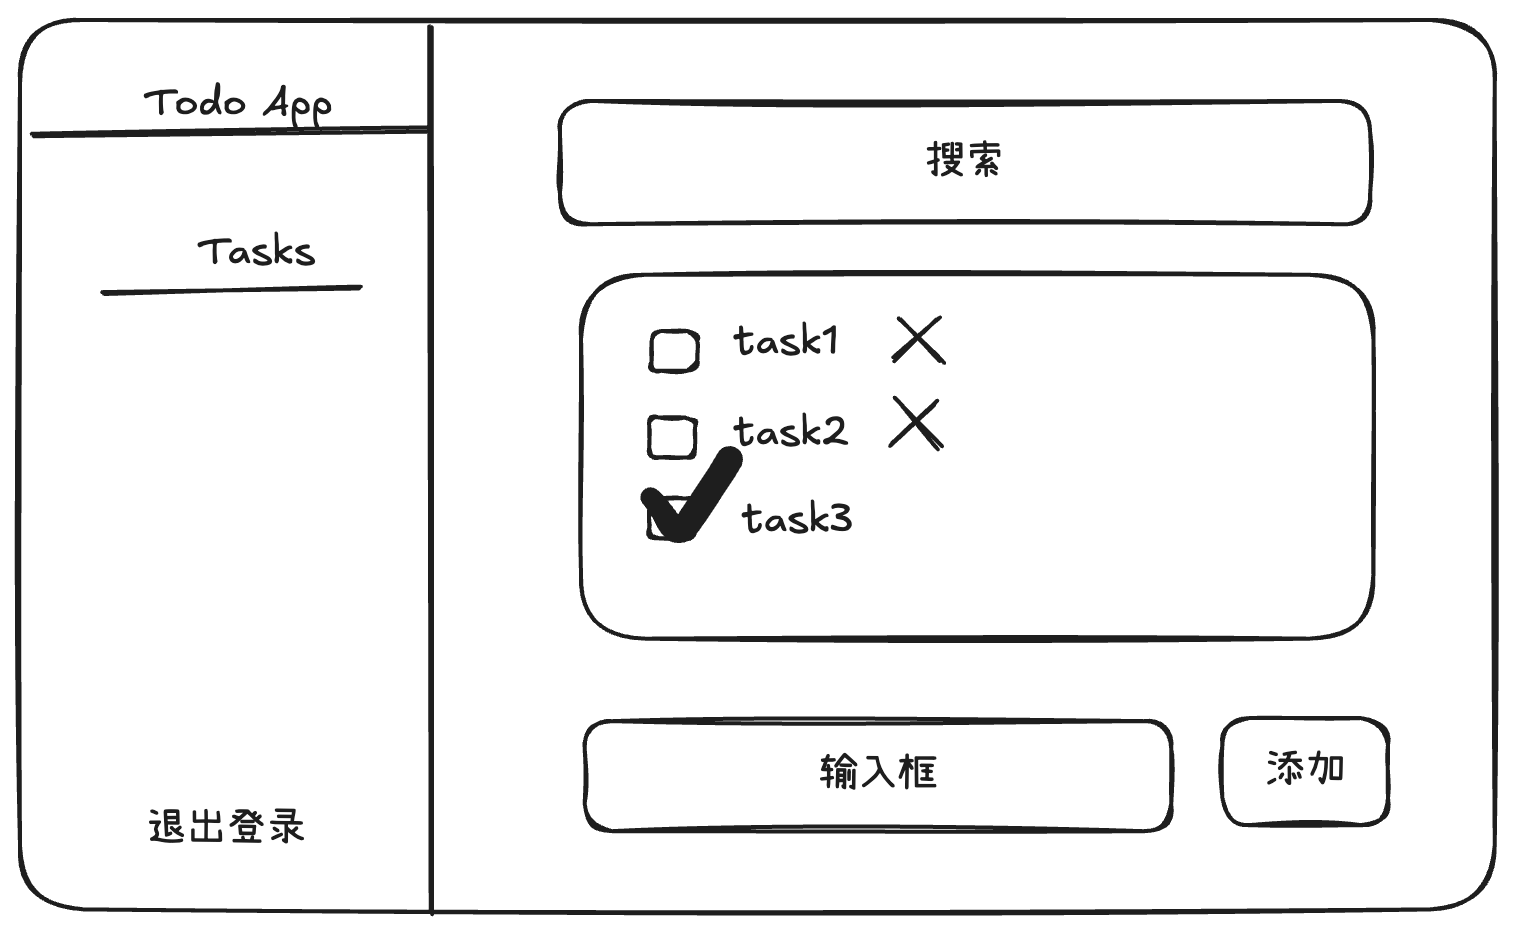
# Todo 列表
# 功能实现
# 注册
注册功能比较简单
- Get
/user/signup,渲染注册表单 - Post
/user/signup,获取和验证表单数据,然后创建用户,插入数据库
# 渲染注册表单
渲染注册表单页面,使用 Pug 模版、Scss 语法并使用 BEM (opens new window) 规范
首先定义一个基础模板,其使用一些公共的 CSS 和 JS
//- 基础模板 - base.pug
doctype html
html
  head
    title ToDo - #{title}
    block stylesheet
      link(rel='stylesheet', href='/css/index.css')
  body
    div#root
      block root
    block script
      script(src="/js/index.js")
2
3
4
5
6
7
8
9
10
11
12
注册模板继承基础模版,并添加自己的 CSS 和 JS
//- 注册模板
extends base

block title
  title ToDo - Sign Up

block append stylesheet
   link(rel='stylesheet', href='/css/sign-in-up.css')

block append script
  script(src="/js/sign-in-up.js")

block root
  div.sign-in-up
    form.sign-in-up__form(action="" method="post")
      div.sign-in-up__form__title 注册
      div.sign-in-up__form__item
        label(for="username" class='sign-in-up__form__item__label') 用户名
        input#username(type="text" name="username" class='sign-in-up__form__item__input' value=username required)
      div.sign-in-up__form__item
        label(for="email" class='sign-in-up__form__item__label') 邮箱
        input#email(type="email" name="email" class='sign-in-up__form__item__input' value=email required)
      div.sign-in-up__form__row
        label(for="password" class='sign-in-up__form__item__label') 密码
        input#password(type="password" name="password" class='sign-in-up__form__item__input' value=password required)
      div.sign-in-up__form__button
        button#sign-up-submit(type="submit" class='sign-in-up__form__button__submit') 注册
        button#sign-up-cancel(type="button" class='sign-in-up__form__button__cancel') 取消
      div.sign-in-up__form__error= error
2
3
4
5
6
7
8
9
10
11
12
13
14
15
16
17
18
19
20
21
22
23
24
25
26
27
28
29
模板定义了 username、email、password 以及 error 插值变量。
通过 res.render 函数渲染注册表单
router.get('/signup', (req, res) => {
  res.render('sign-up')
})
2
3
# 注册用户
完成以下功能:
- 首先使用内置中间件
express.urlencoded()(opens new window) 处理 request body,处理后的数据存储在req.body属性 - 验证用户名、邮箱、密码必填,密码长度必须大于等于 6 位(可以自行扩展更复杂的密码校验)以及用户名/邮箱不能重复
- 创建用户,插入数据库。数据库仍然使用 创建 Node.js 后台服务 介绍的 Sequelize (opens new window) + sqlite3 (opens new window)
router.post('/signup', async (req, res) => {
  const { username, email, password } = req.body;
  if (!username || !email || !password) {
    const error = !username ? "请填写用户名" : (!email ? "请填写邮箱" : "请填写密码");
    res.status(400).render('sign-up', { error: error, ...req.body });
    return;
  }
  if (password.length < 6) {
    res.status(400).render('sign-up', { error: "密码至少6位", ...req.body });
    return;
  }
  let user = await User.findOne({
    where: {
      username
    }
  });
  if (user) {
    res.status(400).render('sign-up', { error: "用户名已存在", ...req.body });
    return;
  } else {
    user = await User.findOne({
      where: {
        email
      }
    });
    if (user) {
      res.status(400).render('sign-up', { error: "邮箱已存在", ...req.body });
      return;
    } else {
      const newUser = await User.create({
        username,
        email,
        password
      });
      res.redirect('/user/signin');
      return;
    }
  }
})
2
3
4
5
6
7
8
9
10
11
12
13
14
15
16
17
18
19
20
21
22
23
24
25
26
27
28
29
30
31
32
33
34
35
36
37
38
39
# 登录与验证
我们采用 session + cookie 的方式实现登录与验证,具有以下特点:
- Session:将用户信息存储在服务器端(内存、数据库或缓存),用一个唯一的 Session ID 关联用户状态。
- Cookie:客户端只存储 Session ID,用于标识用户的会话。
Express 可以使用 expressjs/session (opens new window) 中间件处理 session 和 cookie。
$ npm i express-session
# 登录
渲染登录表单
登录表单和注册表单类似,通过 res.render 函数渲染登录表单
router.get('/signin', (req, res) => {
  res.render('sign-in')
})
2
3
配置 express-session 中间件
import session from 'express-session';

// 配置 express-session 中间件
app.use(
  session({
    secret: 'my_session_secret_key', // 用于加密 Session ID 的密钥
    resave: false,                  // 是否每次请求都重新保存 Session
    saveUninitialized: false,       // 是否为未初始化的 Session 分配存储
    cookie: {
      httpOnly: true,               // 防止 XSS 攻击
      secure: false,                // 本地开发时关闭,生产环境启用 HTTPS 时设置为 true
      maxAge: 60 * 60 * 1000,       // 设置 Session 有效期 (1 小时)
    },
  })
);
2
3
4
5
6
7
8
9
10
11
12
13
14
15
处理登录请求
router.post('/signin', async (req, res) => {
  const { username, password } = req.body;
  if (!username || !password) {
    const error = !username ? "请填写用户名" : "请填写密码";
    res.status(500).render('sign-in', { error: error, ...req.body });
    return;
  }
  const user = await User.findOne({
    where: {
      username,
      password
    }
  });
  if (user) {
    req.session.user = user;
    res.redirect('/');
    return;
  } else {
    res.status(500).render('sign-in', { error: "用户名或密码错误", ...req.body });
    return;
  }
})
2
3
4
5
6
7
8
9
10
11
12
13
14
15
16
17
18
19
20
21
22
# 验证
定义验证中间件,如果用户没有登录或者 cookie 失效,跳转至登录页面
// 验证中间件
app.use((req, res, next) => {
  if (req.session.user) {
    // 已登录时,登录和注册都重定向到 todo 页面
    if (req.url === '/user/signin' || req.url === '/user/signup') {
      return res.redirect('/todo');
    }

    return next();
  }

  // 没有登录,跳转至登录页面
  res.redirect('/user/signin');
});
2
3
4
5
6
7
8
9
10
11
12
13
14
# 退出登录
在 HTML 中 <form> 是唯一直接发送 POST 请求的方式,如果不想使用 form,只能使用 JavaScript。
退出登录使用 Fetch_API (opens new window) 发送 POST 请求
const logoutBtn = document.getElementById("logout")
if (logoutBtn) {
  logoutBtn.addEventListener("click", () => {
    fetch("/user/logout", {
      method: "POST"
    }).then((res) => {
      if (res.ok) {
        location.href = "/user/signin"
      }
    })
  })
}
2
3
4
5
6
7
8
9
10
11
12
处理"退出登录"请求
router.post('/logout', (req, res) => {
  req.session.destroy((err) => {
    if (err) {
      return res.status(500).send({ message: '退出失败' });
    }

    res.clearCookie('connect.sid'); // 清除 Session Cookie
    res.status(200).send({ message: '退出成功' });
  });
})
2
3
4
5
6
7
8
9
10
# Redis
expressjs/session (opens new window) 默认使用 MemoryStore,在大多数情况下,它会导致内存泄漏,一般用于开发。生产环境可以使用 Redis (opens new window),它是一个高性能的内存数据库,非常适用于 Session 存储。首先安装 node-redis (opens new window)/ioredis (opens new window) 和 connect-redis (opens new window)
$ npm i ioredis connect-redis
配置 expressjs/session (opens new window)
import Redis from 'ioredis';
import { RedisStore } from 'connect-redis';

const redisClient = new Redis();
const redisStore = new RedisStore({
  client: redisClient,
  prefix: "todo:",
})

app.use(
  session({
    store: redisStore,
    secret: "my_session_secret_key", // 用于加密 Session ID 的密钥
    resave: false,                  // 是否每次请求都重新保存 Session
    saveUninitialized: false,       // 是否为未初始化的 Session 分配存储
    cookie: {
      httpOnly: true,               // 防止 XSS 攻击
      secure: false,                // 本地开发时关闭,生产环境启用 HTTPS 时设置为 true
      maxAge: 60 * 60 * 1000,       // 设置 Session 有效期 (1 小时)
    },
  })
);
2
3
4
5
6
7
8
9
10
11
12
13
14
15
16
17
18
19
20
21
22
Redis 是一个单独的服务,需要安装并单独启动
$ brew install redis
$ redis-server
2
然后启动 NodeJS 服务即可
# 任务列表
# 建立数据库表
export const User = sequelize.define('User', {
  id: { type: DataTypes.INTEGER, primaryKey: true, allowNull: false, autoIncrement: true },
  username: { type: DataTypes.STRING, allowNull: false, unique: true },
  email: { type: DataTypes.STRING, allowNull: false, unique: true },
  password: { type: DataTypes.STRING, allowNull: false },
  createdAt: { type: DataTypes.DATE, allowNull: false, defaultValue: DataTypes.NOW },
  updatedAt: { type: DataTypes.DATE, allowNull: false, defaultValue: DataTypes.NOW },
});

export const Task = sequelize.define('Task', {
  id: { type: DataTypes.INTEGER, primaryKey: true, allowNull: false, autoIncrement: true },
  title: { type: DataTypes.STRING, allowNull: false },
  description: DataTypes.STRING,
  completed: { type: DataTypes.BOOLEAN, allowNull: false, defaultValue: false },
  createdAt: { type: DataTypes.DATE, allowNull: false, defaultValue: DataTypes.NOW },
  updatedAt: { type: DataTypes.DATE, allowNull: false, defaultValue: DataTypes.NOW }
});

// 一个用户可以创建多个任务
User.hasMany(Task);
2
3
4
5
6
7
8
9
10
11
12
13
14
15
16
17
18
19
20
# UI 界面
Layout 模板
左边菜单栏,右边内容页的布局方式
//- 布局模板
extends base

block root
  div.layout
    div.layout__sidebar
      a(href="/" class='layout__sidebar__header')
        img(src="/images/logo.png" alt="logo" class='layout__sidebar__header__logo')
        span.layout__sidebar__header__title ToDo App
      div.layout__sidebar__menu
        a(href="/todo" class='layout-sider__menu__item') Tasks
      div.layout__sidebar__footer
        button#logout.layout__sidebar__footer__logout 退出登录
    div.layout__content
      block content
2
3
4
5
6
7
8
9
10
11
12
13
14
15
16
任务列表
extends layout

block title
  title ToDo - Tasks

block append stylesheet
   link(rel='stylesheet', href='/css/tasks.css')

block content
  div.tasks
    div.tasks__search
      form(action="" method="get")
        input(type="search" class='tasks__search__input' name="search" placeholder="搜索" value=search)
    div(class={ 'tasks__list': true, 'tasks__list--empty': tasks.length === 0 })
      each task in tasks
        div(class={ 'tasks__list__item': true, 'tasks__list__item--completed': task.completed })
          form(action=`/tasks/${task.id}?_method=PUT` method="post")
            input(type="checkbox" name="completed" class="tasks__list__item__checkbox" checked=task.completed onchange="this.form.submit()")
          span.tasks__list__item__title= task.title
          if !task.completed
            form(action=`/tasks/${task.id}?_method=DELETE` method="post" style="display:inline;")
              button(type="submit" class="tasks__list__item__delete") X
      if tasks.length === 0
        div 无任务
    div.tasks__error= error
    div.tasks__add
      form(action="" method="post")
        input(type="text" class='tasks__add__input' name="name" placeholder="任务" required)
        button(type="submit" class='tasks__add__button') 添加
2
3
4
5
6
7
8
9
10
11
12
13
14
15
16
17
18
19
20
21
22
23
24
25
26
27
28
29
这里有 4 个 form 表单,对应 4 个操作
- 查询,GET 方法
- 新增,POST 方法
- 删除任务,DELETE 方法
- 标记任务完成,PUT 方法
因为 form 只支持 GET 和 POST 方法,所以删除任务和标记任务完成,需要借助 method-override (opens new window)
安装 method-override
$ npm i method-override
配置 method-override 中间件
import methodOverride from "method-override";
app.use(methodOverride("_method")); // 解析 `_method` search 参数
2
使用
form(action=`/tasks/${task.id}?_method=PUT` method="post")
# 处理任务操作
主要是数据库的增删改查操作
// 查询
router.get('/',async (req, res) => {
  const { search = '' } = req.query || {};
  const user = req.session.user;
  if (!user) {
    res.redirect('/user/signin');
    return;
  }
  const tasks = await Task.findAll({
    where: {
      UserId: user.id,
      title: {
        [Op.like]: `%${search}%`
      }
    },
    order: [
      ['updatedAt', 'DESC']
    ]
  });
  res.render('tasks', { tasks, search });
})

// 新增
router.post('/', async (req, res) => {
  const { name } = req.body;
  if (!name) {
    res.status(500).send({ message: '名称不能为空' });
    return;
  }
  const user = req.session.user;
  if (!user) {
    res.redirect('/user/signin');
    return;
  }

  const task = await Task.create({
    title: name,
    UserId: user.id
  });

  res.redirect('/tasks');
})

// 更新任务完成状态
router.put("/:id", async (req, res) => {
  const { id } = req.params;
  const completed = req.body.completed === "on"; // checkbox 选中时值为 'on'

  const task = await Task.findByPk(id);
  if (!task) return res.status(404).send({ message: "任务不存在" });

  task.completed = completed;
  await task.save();
  res.redirect("/tasks");
});

// 删除任务
router.delete("/:id", async (req, res) => {
  const { id } = req.params;
  const task = await Task.findByPk(id);
  if (!task) return res.status(404).send({ message: "任务不存在" });

  await task.destroy();
  res.redirect("/tasks");
});
2
3
4
5
6
7
8
9
10
11
12
13
14
15
16
17
18
19
20
21
22
23
24
25
26
27
28
29
30
31
32
33
34
35
36
37
38
39
40
41
42
43
44
45
46
47
48
49
50
51
52
53
54
55
56
57
58
59
60
61
62
63
64
65
# 实现效果
# 完整代码
express-todo (opens new window)
# References
- Express (opens new window)
- Express API (opens new window)
- Database integration (opens new window)
- HTTP response status codes (opens new window)
expressjs/express(opens new window)pugjs/pug(opens new window)mde/ejs(opens new window)handlebars-lang/handlebars.js(opens new window)marko-js/marko(opens new window)mozilla/nunjucks(opens new window)janl/mustache.js(opens new window)expressjs/session(opens new window)crypto-utils/uid-safe(opens new window)expressjs/method-override(opens new window)redis/node-redis(opens new window)redis/ioredis(opens new window)connect-redis(opens new window)motdotla/dotenv(opens new window)auth0/node-jsonwebtoken(opens new window)- BEM (opens new window)