# 创建 Node.js 后台服务
上一篇文章 创建 Node.js 命令行工具,我们使用 Node.js 创建了命令行工具 chinesize,这篇文章我们使用 Node.js 创建后台服务,这是一篇简单的入门教程,我们将实现最简单的增删改查服务,希望借此通往后端开发。
# 简单的 HTTP 服务
首先我们创建项目 node-server
$ mkdir node-server
$ cd node-server
$ npm init --yes
2
3
然后使用 http 模块创建一个简单的 HTTP 服务
// index.js
import http from 'node:http';

const server = http.createServer((req, res) => {
  res.statusCode = 200;
  res.setHeader('Content-Type', 'text/plain');
  res.end('Hello Node.js\n');
});

server.listen(3000, () => {
  console.log('Server running on http://localhost:3000');
});
2
3
4
5
6
7
8
9
10
11
12
运行
$ node index.js
在浏览器里输入 http://localhost:3000/ 就能看到
这样一个简单的 HTTP 服务就完成了,接下来我们实现常用的增删改查功能
# Node.js 调试
正所谓"工欲善其事,必先利其器",在实现具体功能之前,我们先来学习一下怎么调试 Node.js。
本文介将绍调试 Node.js 的两种方式:
- Node.js 启用 Inspector (opens new window)
- VSCode 调试 Node.js
# Node.js 启用 Inspector
Node.js 通过开启 --inspect 选项进行调试,启用 --inspect 选项后,Node.js 进程将会侦听调试客户端(默认情况下监听 127.0.0.1:9229,可以通过其它选项修改主机地址和端口),每个进程还分配有一个唯一的 UUID。Inspector 客户端必须知道并指定要连接的主机地址、端口和 UUID。完整的 URL 将类似于 ws://127.0.0.1:9229/0f2c936f-b1cd-4ac9-aab3-f63b0f33d55e。

然后我们就可以利用 Chrome 浏览器进行调试了
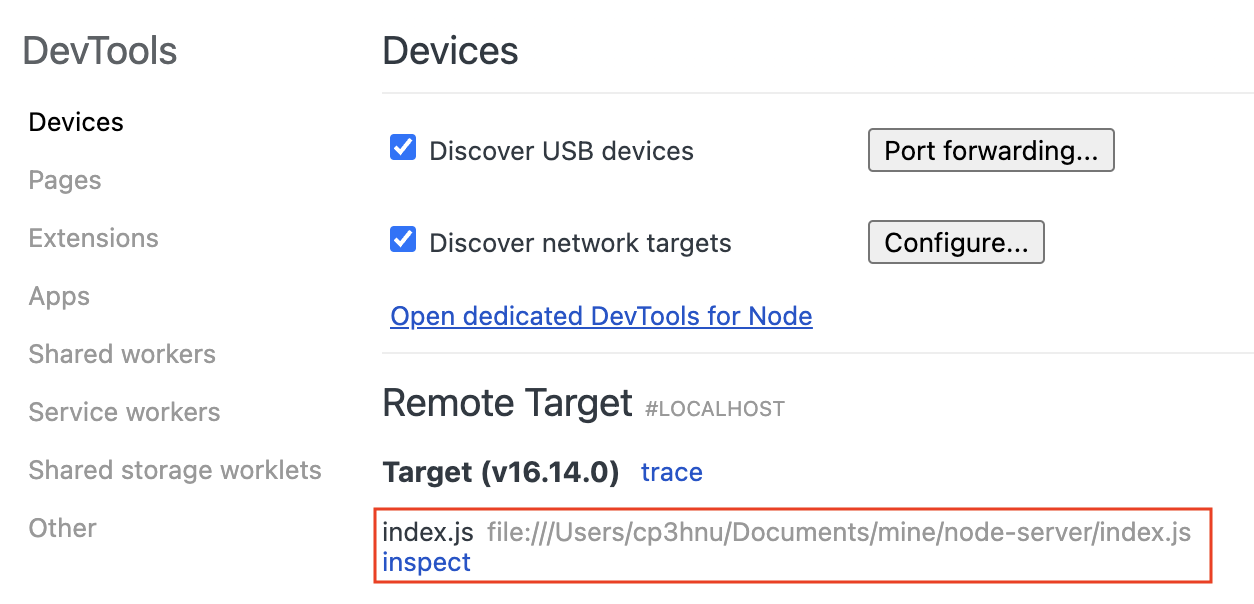
在 Chrome 浏览器中打开 chrome://inspect,可以看到我们的 Node.js 服务

点击 inspect

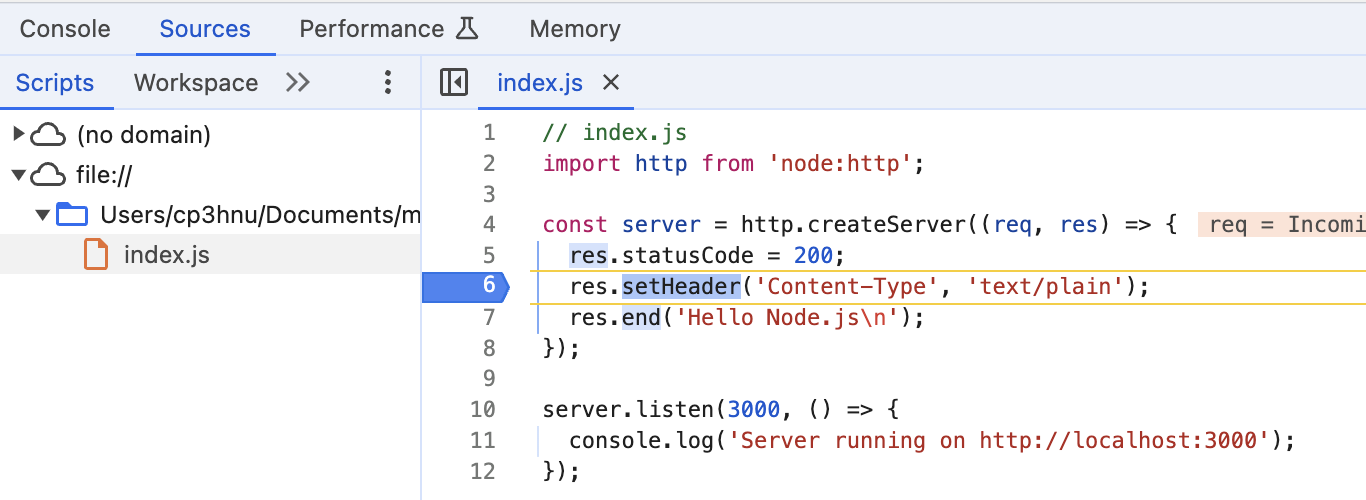
就可以像调试前端代码一样调试 Node.js 了。
# VS Code 调试 Node.js
因为我是用 VS Code 开发的,VS Code 提供了四种方法调试 Node.js
- 使用 自动附加 (opens new window)调试您在 VS Code 的集成终端中运行的进程。
- 使用 JavaScript 调试终端 (opens new window),类似于使用集成终端。
- 附加到在 VS Code 外部启动的 进程 (opens new window)。
- 使用 启动配置 (opens new window)启动程序。
这里我们使用最后一种方式:使用 启动配置 (opens new window)启动程序。因为这种方式最简洁、最方便
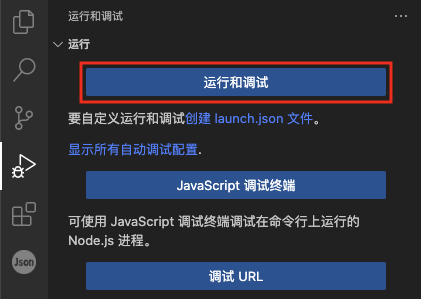
首先我们创建启动配置文件,侧边栏选择 "运行和调试",在点击下图的 "运行和调试" 按钮

选择 "Node.js"

在本地目录下会创建了一个 .vscode/launch.json 文件
{
  // 使用 IntelliSense 了解相关属性。
  // 悬停以查看现有属性的描述。
  // 欲了解更多信息,请访问: https://go.microsoft.com/fwlink/?linkid=830387
  "version": "0.2.0",
  "configurations": [
    {
      "type": "node",
      "request": "launch",
      "name": "启动程序",
      "skipFiles": [
        "<node_internals>/**"
      ],
      "program": "${workspaceFolder}/index.js"
    }
  ]
}
2
3
4
5
6
7
8
9
10
11
12
13
14
15
16
17
然后我们就可以运行 "启动程序" 进行调试了

我们可以设置断点,查看变量值、单步执行等。关于调试的更多详情,请参考 Node.js debugging in VS Code (opens new window) 和 Debugging (opens new window)
# 用户管理系统
接下来我们实现一个用户管理系统,主要功能就是实现用户的增删改查(CURD)。
我们将实现下面这些功能:
GET    /users     // 列表
GET    /users/1   // 详情
POST   /users     // 新增
PUT    /users/1   // 全量替换
PATCH  /users/1   // 局部更新
DELETE /users/1   // 删除
2
3
4
5
6
用户的结构如下:
{ "id": 1, "name": "cp3hnu", age: 18 }
首先我们修改之前的服务,获取 method、pathname 和 id 参数。
const server = http.createServer((req, res) => {
  // 获取 method
  const { method, url: reqUrl } = req;
  const url = new URL(reqUrl, 'http://localhost:3000');
  const { pathname } = url;
  const paths = pathname.split('/').filter(Boolean);
  // 获取 pathname 和 id
  const path = paths[0];
  const id = paths[1];

  if (path !== "users") {
    res.statusCode = 404;
    res.end('Not Found');
    return;
  }

  switch (method) {
    case 'GET':
      return getUsers(response, request, id);
    case 'POST':
      return postUsers(response, request);
    case 'PATCH':
      return patchUsers(response, request, id);
    case 'PUT':
      return putUsers(response, request, id);
    case 'DELETE:
      return deleteUsers(response, request, id);
    default:
      response.statusCode = 405;
      response.end('Method Not Allowed');
  }
});
2
3
4
5
6
7
8
9
10
11
12
13
14
15
16
17
18
19
20
21
22
23
24
25
26
27
28
29
30
31
32
后面会介绍 Express 框架,帮我们处理请求路由。
# 获取列表或详情
当路径中存在 id 时,getUsers 返回用户详情,否则返回列表。一般返回列表的接口支持 query 筛选数据,我们可以使用 URLSearchParams (opens new window) 获取查询参数,也可以使用 qs (opens new window) 或者 query-string (opens new window) 第三方库。
const getUsers = (response, request, id) => {
  // 获取详情
  if (id && !isNaN(id)) {
    const idNum = Number(id);
    const user = users.find(user => user.id === idNum);
    if (!user) {
      response.statusCode = 404;
      response.end('Not Found');
      return;
    } else {
      response.statusCode = 200;
      response.setHeader('Content-Type', 'application/json');
      response.end(JSON.stringify(user));
    }
  } else {
    // 获取列表
    const url = new URL(request.url, 'http://localhost:3000');
    const query = url.searchParams;
    const name = query.get('name');
    let filteredUsers = users;
    if (name) {
      filteredUsers = users.filter(user => user.name === name);
    }
    response.statusCode = 200;
    response.setHeader('Content-Type', 'application/json');
    response.end(JSON.stringify(filteredUsers));
  }
}
2
3
4
5
6
7
8
9
10
11
12
13
14
15
16
17
18
19
20
21
22
23
24
25
26
27
28
# 新增
新增时,需要处理 post 请求发生的数据,Node.js 通过 data 事件传递数据,end 事件表示数据传递完成
Post 常用的请求数据格式有四种,通过请求头的 Content-Type 属性指定:
application/json现在常用的 JSON 格式,比如:
{
  name: "cp3hnu",
  age: 18
}
1
2
3
4application/x-www-form-urlencoded表单编码格式
multipart/form-data这个多用于文件批次上传
text/*文本,比如
text/plain表示纯文本,text/html表示 HTML 格式
新增用户基本上是用 application/json 或者 application/x-www-form-urlencoded。
# application/json
如果是 application/json,接收完数据,使用 JSON.parse 转换成对象
const postUsers = (response, request) => {
  // 设置接收数据的编码格式为 UTF-8
  request.setEncoding('utf8');
  let body = '';
  // data 事件,接收请求数据
  request.on('data', (data) => {
    body += data;
  });
  // end 事件,表示数据传递完成
  request.on('end', () => {
    const newUser = JSON.parse(body);
    newUser.id = findMaxId(users) + 1;
    users.push(newUser);
    response.statusCode = 201;
    response.setHeader('Content-Type', 'application/json');
    response.end(JSON.stringify(newUser));
  });
}
2
3
4
5
6
7
8
9
10
11
12
13
14
15
16
17
18
# application/x-www-form-urlencoded
如果是 application/x-www-form-urlencoded,接收完数据,可以使用 Node.js 的内置 querystring (opens new window) 模块解析
const postUsers = (response, request) => {
  // 设置接收数据的编码格式为 UTF-8
  request.setEncoding('utf8');
  let body = '';
  // data 事件,接收请求数据
  request.on('data', (data) => {
    body += data;
  });
  // end 事件,表示数据传递完成
  request.on('end', () => {
    const newUser = querystring.parse(body);
    newUser.id = findMaxId(users) + 1;
    users.push(newUser);
    response.statusCode = 201;
    response.setHeader('Content-Type', 'application/json');
    response.end(JSON.stringify(newUser));
  });
}
2
3
4
5
6
7
8
9
10
11
12
13
14
15
16
17
18
除了手动自己处理 body 数据之外,还可以使用一些第三库,比如 body-parser (opens new window) 和 raw-body (opens new window),以及处理 multipart/form-data 的 multer (opens new window) 和 formidable (opens new window)
# 修改
有两种方式支持修改,PUT 和 PATCH,它们的区别是:
PUT,全量替换,如果某个字段没有确定值,那替换后该字段的值就被清除了PATCH,局部更新,如果某个字段没有确定值,那更新后该字段的值保持不变
一般开发中基本是都是使用 PATCH,局部更新
const patchUsers = (response, request, id) => {
  request.setEncoding('utf8');
  let body = '';
  request.on('data', (data) => {
    body += data;
  });
  request.on('end', () => {
    const updatedUser = JSON.parse(body);
    const index = users.findIndex(user => user.id === Number(id));
    if (index === -1) {
      response.statusCode = 404;
      response.end('Not Found');
      return;
    }
    users[index] = { ...users[index], ...updatedUser };
    response.statusCode = 200;
    response.setHeader('Content-Type', 'application/json');
    response.end(JSON.stringify(users[index]));
  });
}
2
3
4
5
6
7
8
9
10
11
12
13
14
15
16
17
18
19
20
# 删除
删除很简单,找到对应的用户,删除即可
const deleteUsers = (response, request, id) => {
  const index = users.findIndex(user => user.id === Number(id));
  if (index === -1) {
    response.statusCode = 404;
    response.end('Not Found');
    return;
  }
  users.splice(index, 1);
  response.statusCode = 204;
  response.end();
}
2
3
4
5
6
7
8
9
10
11
# 连接数据库
上面我们实现了用户的增删改查功能,但是没有实现数据持久化,服务重启之后,数据就丢失了。接下来我们实现数据持久化,一般的后台服务都是通过数据库实现持久化的,所以接下来我们在我们用户管理系统里连接数据库。
# 有哪些数据库?
在 Node.js 开发中,我们可以使用多种数据库,具体选择取决于项目的需求和数据结构。
那在 Node.js 开发中有哪些数据库?该怎么选择呢?
# 关系型数据库 (SQL)
关系型数据库使用结构化表格存储数据,适合需要事务支持或复杂查询的应用。
Node.js 中与 SQL 数据库配合常用的库是 Sequelize (opens new window)、TypeORM (opens new window)、Knex.js (opens new window)、Prisma (opens new window)、Drizzle (opens new window) 等。
MySQL / MariaDB
- 优势:高性能、开源、跨平台,MySQL 在 Web 应用中非常流行。
- 配合使用的 Node.js 驱动:mysql2 (opens new window)(比原生 mysql 库性能更高,支持 Promise 和 async/await)
PostgreSQL
- 优势:支持复杂查询、ACID 事务、扩展性好,适合需要更高级 SQL 功能的应用。
- 配合使用的 Node.js 驱动:pg (opens new window) 和 postgres (opens new window)
SQLite
- 优势:轻量级,无需单独服务器,适合小型应用或嵌入式应用。
- 配合使用的 Node.js 驱动:sqlite3 (opens new window)
# NoSQL 数据库
NoSQL 数据库适合处理非结构化或半结构化数据。它们更灵活,支持水平扩展,适合快速开发和大规模数据处理。
- MongoDB
- 优势:灵活的文档模型(JSON-like),易于扩展,适合处理多变的非结构化数据。
- 配合使用的 Node.js 驱动:Mongoose (opens new window) 和 node-mongodb-native (opens new window)(MongoDB 官方驱动)
- Redis
- 优势:内存型数据库,支持数据持久化,速度极快,适合缓存、会话管理或需要快速数据访问的应用。
- 配合使用的 Node.js 驱动:ioredis (opens new window)(高性能 Redis 客户端)或 redis (opens new window)(官方驱动)
- Cassandra
- 优势:分布式设计,适合大规模数据写入和多数据中心部署的应用。
- 配合使用的 Node.js 驱动:cassandra-driver (opens new window)
# 时序数据库
适合处理时间序列数据,比如日志、监控数据、物联网数据。
- InfluxDB
- 优势:专为时间序列数据设计,支持高效的读写操作和时间序列分析。
- 配合使用的 Node.js 驱动:influx (opens new window)
# 图数据库
图数据库可以方便地管理节点和边的关系,用于社交网络、推荐系统等应用。
- Neo4j
- 优势:擅长处理关系密集型数据,适合图结构的数据。
- 配合使用的 Node.js 驱动:neo4j-driver (opens new window)(Neo4j 官方驱动)
# 全文搜索引擎
用于快速检索和查询大量文本数据。
- Elasticsearch
- 优势:强大的全文搜索和分析功能,适合大规模文本检索和日志分析。
- 配合使用的 Node.js 驱动:@elastic/elasticsearch (opens new window)(官方驱动)
怎么选择?
- 数据模型:如果数据是结构化的,SQL 数据库是不错的选择;如果数据是非结构化的或频繁变化,MongoDB 可能更合适。
- 性能和扩展性:Redis 和 Cassandra 适合高并发、低延迟的场景。
- 事务和一致性:需要事务支持的可以选择 PostgreSQL 或 MySQL。
- 复杂查询:如果需要复杂的查询,PostgreSQL 比较灵活,Elasticsearch 适合全文搜索需求。
# 选择
我们这里只是一个 demo,没有复杂的结构,所以我们选择 Sequelize (opens new window) + sqlite3 (opens new window),以后有时间可以都研究一下。
# 安装
$ npm i sequelize sqlite3
# 创建
import { Sequelize, DataTypes } from "sequelize";
import path, { dirname} from 'node:path';
import { fileURLToPath } from 'node:url';

const __filename = fileURLToPath(import.meta.url);
const __dirname = dirname(__filename);
const filePath = path.join(__dirname, 'database.sqlite');

export const sequelize = new Sequelize({
  dialect: 'sqlite',
  storage: filePath
});

// Model
export const User = sequelize.define('User', {
  id: { type: DataTypes.INTEGER, primaryKey: true, allowNull: false, autoIncrement: true },
  name: DataTypes.STRING,
  age: DataTypes.INTEGER
});
2
3
4
5
6
7
8
9
10
11
12
13
14
15
16
17
18
19
# 验证连接
try {
  await sequelize.authenticate();
  console.log('Connection has been established successfully.');
} catch (error) {
  console.error('Unable to connect to the database:', error);
}
2
3
4
5
6
# 同步
await sequelize.sync();
# 搜索
// 通过名称过滤
const users = await User.findAll({
  where: {
    name: {
      [Op.substring]: name,
    }
  }
})

// 获取 id 对应的用户
const users = await User.findAll({
  where: {
    id: id
  }
});
const user = users[0];
2
3
4
5
6
7
8
9
10
11
12
13
14
15
16
# 创建
const user = await User.create(userData);
# 更新
// 直接更新,返回值是更新的数量
const result = await User.update(
  userData
  {
    where: {
      id: id,
    },
  },
);
const nums = result[0] // 更新的个数

// 最好是先获取,再更新,因为接口还要返回数据
const user = ... // 查询出来的用户
const userData = ... // form 表单数据
const newUser = await user.update(userData);
// 返回 newUser 给 response
2
3
4
5
6
7
8
9
10
11
12
13
14
15
16
# 删除
// 搜索之后删除
const user = ... // 查询出来的用户
await user.destroy();

// 或者直接删除
// num 是删除的个数
cosnt num = await User.destroy({
  where: {
    id: id,
  },
});
2
3
4
5
6
7
8
9
10
11
# 关闭
// 关闭程序时,需要关闭数据库的连接
process.on('exit', (code) => {
  console.log(`Node.js 进程退出,退出码:${code}`);
  sequelize.close();
});

process.on('SIGINT', () => {
  console.log('接收到 SIGINT 信号,进程即将终止');
  sequelize.close();
  process.exit();
});

process.on('SIGTERM', () => {
  console.log('接收到 SIGTERM 信号,进程即将终止');
  sequelize.close();
  process.exit();
});
2
3
4
5
6
7
8
9
10
11
12
13
14
15
16
17
现在我们的服务实现了数据持久化,服务重启后数据依然存在。这里只是介绍了 Sequelize 的一些基本操作,更多详情请参考 Sequelize (opens new window)。
# Express 框架
在上面用户管理系统的例子中,我们需要自己处理请求路由。开发 Node.js 服务更快的方式是使用框架,它们会帮我们处理好这些细节,我们只管实现具体功能。Express (opens new window) 框架是开发 Node.js 服务成熟的框架,除此之外还有:
-
- 简介: 由 Express 团队开发,Koa 是一个更轻量、模块化的框架,专注于中间件的使用。它没有内置的路由或模板引擎,适合需要高自由度的开发者。
- 特点: 支持 async/await 语法,使得异步代码更简洁;非常适合需要高度定制化的 API 开发。
-
- 简介: NestJS 是一个受 Angular 启发的全栈框架,使用 TypeScript 编写,结构清晰,适合构建复杂的企业应用。
- 特点: 基于模块化架构,支持依赖注入,拥有丰富的功能和生态。它内置支持 GraphQL、WebSocket、gRPC 等,适合需要良好架构的项目。
-
- 简介: Fastify 是一个专注于性能的框架,与 Express 类似但更快,且在设计上提供更好的开发体验。
- 特点: 支持 JSON Schema 验证,插件系统强大,针对性能优化,适合需要高并发的场景。
-
- 简介: Hapi 是一个用于构建强大应用和 API 的企业级框架,广泛用于构建大型项目。
- 特点: 提供一套丰富的插件系统,可以很方便地进行身份验证、输入验证、缓存等操作。Hapi 的配置性很强,非常适合需要严格控制的项目。
-
- 简介: Sails.js 是一个 MVC 框架,灵感来自 Ruby on Rails。它基于 Express 构建,但提供更丰富的功能,尤其适合实时应用。
- 特点: 提供水手式蓝图(Blueprint),让 API 开发更加快捷。支持实时功能,内置与 WebSocket 集成。
Feathers.js (opens new window)
- 简介: Feathers.js 是一个轻量级框架,适合构建实时应用和 RESTful API,具有很强的可扩展性。
- 特点: 提供服务的概念,可以轻松添加、删除服务,同时支持与数据库(MongoDB、MySQL 等)无缝集成。
框架选择建议:
- 如果你需要一个简单、快速的应用,可以考虑 Express、 Koa 或 Fastify。
- 对于大型项目或有企业级需求,Hapi 和 NestJS 是不错的选择。
- 如果你习惯于 MVC 架构,Sails.js 是一个理想的选择。
- Feathers.js 是构建实时应用和 RESTful API 的好选择。
从 npm trends (opens new window) 来看,下载量方面 Express 遥遥领先,多出一个数量级,然后依次是 NestJS、 Koa 和 Fastify。GitHub Star 方面 NestJS 最多,Express 紧随其后。根据 npm trends (opens new window),推荐 Express 和 NestJS。
# 重构用户管理系统
# 安装
$ npm i express
# 实现
Express 提供了路由功能 (opens new window),确定应用程序如何响应客户端请求,路由采用以下结构:
app.METHOD(PATH, HANDLER)
app: 是Express的一个实例。METHOD: 是小写的 HTTP 请求方法 (opens new window)。PATH: 是服务器上的路径。HANDLER: 是路由匹配时执行的函数。
此外,Express 使用 path-to-regexp (opens new window) 匹配路由路径,比如 /users/:id(\\d+),匹配 /users/1,不匹配 /users/info,并且匹配的路径参数值可以通过 request.params 获取,比如通过 request.params.id 获取用户 ID。关于路由的更多详情,请参考 Routing (opens new window)。
下面通过 Express 实现用户管理系统:
import express from 'express'
import { getUsers, postUsers, patchUsers, putUsers, deleteUsers } from './users.js'

const app = express()
const port = 3000

app.get('/users', async (req, res) => {
  await getUsers(res, req)
})

app.get('/users/:id(\\d+)', async (req, res) => {
  await getUsers(res, req, req.params.id)
})

app.post('/users', async (req, res) => {
  await postUsers(res, req)
})

app.patch('/users/:id(\\d+)', async (req, res) => {
  await patchUsers(res, req, req.params.id)
})

app.put('/users/:id(\\d+)', async (req, res) => {
  await putUsers(res, req, req.params.id)
})

app.delete('/users/:id(\\d+)', async (req, res) => {
  await deleteUsers(res, req, req.params.id)
})

app.listen(port, async () => {
  console.log(`Example app listening on port ${port}`)
})
2
3
4
5
6
7
8
9
10
11
12
13
14
15
16
17
18
19
20
21
22
23
24
25
26
27
28
29
30
31
32
33
关于 Express 的更详细的介绍,请参考我的下一篇文章 使用 Express 创建 Web 服务.
# 完整代码
GitHub: cp3hnu/node-server (opens new window)